Having lost count of the number of people who have asked me: have you gone digital? I am always left wondering why its such a much-asked question. The camera is only a tool in which a photographer creates an image. His personal ability to create a unique image remains the same.
For many forms of photography, digital has long held obvious advantages, but for landscapes the resolution necessary to make larger prints just wasnt available. But things have changed and digital cameras are fast becoming the tools that most pros use.
Modern digital cameras are perfectly capably of matching the 35 mm film - the format which most landscape photographers begin with. But can they really match the large format film cameras? This is probably the greatest question that all photographers face.
Instant LCD feedback is digitals greatest gift and this enables the photographer to check exposure and composition of their image in the blink of an eye. While this is a big advantage, the hours spent in front of the computer processing the raw images have to be a hindrance. A landscape photographers time is best spent behind a camera not in front of a computer.
The pros and cons of digital photography will remain an issue for some time. At the end of the day a digital camera wont make a photographers images better. The same values we apply in our photography should remain regardless of which camera we use.
Good photography remains as elusive and as enticing as it ever was; going digital doesnt change this or make getting good images any easier. It brings technical advantages, and plenty of them, but the majority of photographic techniques never change. Good landscape images come from the photographers personal ability, not the ability of a camera. The camera helps, but the creative eye remains the same.
As a landscape photographer I am still hesitant to embrace digital photography and all the qualities that digital has brought to other professionals in different photography fields.
There are a few simple reasons that I still use a film camera:
The authenticity of my images could be questioned if I used a digital camera. It is often assumed that great digital images have been manipulated.
Too much time is spent in front of a computer.
Slide film produce stronger colours than a digital camera.
There are many advantages for changing to digital but Im going to stick with film; for the time-being that is. With time film cameras will be a thing of the past and all our images will be exchanged for the pixels. But, be wary - believing our work will be superior would be falling into a great trap. For me size matters, the larger I can print an image the better.
Showing posts with label aperture priority. Show all posts
Showing posts with label aperture priority. Show all posts
Tuesday, November 13, 2007
Friday, July 6, 2007
Group f/64 was a group of photographers espousing a common philosophy. The group was created in 1932. The original membership consisted of:
Ansel Adams
Imogen Cunningham
Willard Van Dyke
John Paul Edwards
Consuelo Kanaga
Alma Lavenson
Preston Holder
Sonia Noskowiak
Henry Swift
Edward Weston
The term f/64 refers to the smallest aperture setting on a large format camera, which secures maximum depth of field, rendering a photograph evenly sharp from foreground to background. Such a small aperture implies a long exposure and the selection of relatively slow moving or motionless subject matter, such as landscapes and still life over action and reportage photography.
This corresponds to the ideal of straight photography which the group espoused in response to the pictorialist methods that were in fashion at the time.
Group f/64 published the following manifesto:
The name of this Group is derived from a diaphragm number of the photographic lens. It signifies to a large extent the qualities of clearness and definition of the photographic image which is an important element in the work of members of this Group.
The chief object of the Group is to present in frequent shows what it considers the best contemporary photography of the West; in addition to the showing of the work of its members, it will include prints from other photographers who evidence tendencies in their work similar to that of the Group.
Group f/64 is not pretending to cover the entire spectrum of photography or to indicate through its selection of members any deprecating opinion of the photographers who are not included in its shows. There are great number of serious workers in photography whose style and technique does not relate to the metier of the Group.
Group f/64 limits its members and invitational names to those workers who are striving to define photography as an art form by simple and direct presentation through purely photographic methods. The Group will show no work at any time that does not conform to its standards of pure photography. Pure photography is defined as possessing no qualities of technique, composition or idea, derivative of any other art form. The production of the "Pictorialist," on the other hand, indicates a devotion to principles of art which are directly related to painting and the graphic arts.
The members of Group f/64 believe that photography, as an art form, must develop along lines defined by the actualities and limitations of the photographic medium, and must always remain independent of ideological conventions of art and aesthetics that are reminiscent of a period and culture antedating the growth of the medium itself.
The Group will appreciate information regarding any serious work in photography that has escaped its attention, and is favorable towards establishing itself as a Forum of Modern Photography.
Sunday, May 13, 2007
How to Make the Best of a Bad Shooting Situation
How to Make the Best of a Bad Shooting Situation
It was a rainy day in Paris. I was in the City of Lights, along with other members of the international photo press, for the debut of Panasonic's latest cameras. I was shooting with the new $349 (estimated street) Lumix DMC-TZ3, which the manufacturer bills as the perfect traveling companion-- pocket-sized but packing 7.2MP, a 10X zoom that starts at a wide 28mm equivalent, image stabilization, and a 3-inch LCD.
But for all that, it couldn't do anything about the rain. Every shot looked dull; even reflections on the wet pavement fell flat. Bad photos of Paris, it is possible? It seemed so.
Then Jerry Grossman of the trade paper, Photo Industry Reporter, held up the LCD of his camera. He'd taken a few images in Sepia mode, and the pictures looked much better than anything shot in color. There was a mass switch to sepia. Granted, not the most sophisticated solution, but it was an idea that helped turn this photo op around.
It's the kind of situation all of us face with our photography -- the weather, the lighting, or the subject may not be cooperating, or you don't have all the time or gear you'd like, but you still have to get good shots. What do you do? Get creative and find workarounds. Here are some solutions for situations that have the makings of photo disasters.
• The Situation:
You're suddenly appointed the party photographer.
The Problem:
All you have is a digital compact, and the tiny flash won't properly light -- let alone flatter -- the guests. Also, capturing tequila-fired red noses isn't going to get you invited next time.
The Solution:
Shut off the flash and switch to black-and-white mode. Yes, the ISO will go through the roof, but in b&w, the digital noise looks like grain. Sort of arty. And chances are, monochrome will be more flattering to all of the revelers.
• The Situation:
A friend asks for a spur-of-the-moment portrait.
The Problem:
Your subject has horribly blotchy skin.
The Solution:
High key. That is, overexpose the shot to drain the detail out of the skin. Digital cameras not only let you use the LCD to see how much overexposure is needed as you bracket (start at a half-stop and work up), but today's sensors also are very good at holding shadow detail while blowing out the highlights in a shot. Which is exactly what you want.
• The Situation:
Aunt Rhodie cooked a delicious roast goose that everyone wants to remember.
The Problem:
The bird doesn't look as good as you hope it will taste.
The Solution:
Shallow depth of field. Go with the widest aperture you can, and focus on that gorgeous sprig of parsley atop the carcass. That's about all that will be sharp. The rest of the image will have that soft, dreamy look so popular in the food magazines from which Aunt Rhodie gets her recipes.
Thursday, May 10, 2007
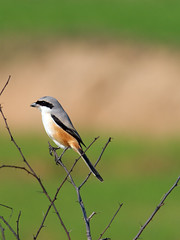
Backyard Bird Photography

 Bird photography is one of the most challenging types of nature photography. Wild birds are often difficult to approach and they never stay in one place for long. Due to the small size and fast-paced behavior of songbirds, large telephoto lenses are often required, and expensive, fast-focusing camera bodies are usually needed. Fortunately, this is not always the case. Your own backyard can serve as a personal studio in which you can be in control of your subjects and obtain beautiful photos. This is one of the very few situations where eye-catching, close-up bird photography is possible without extravagant photo equipment. The following is a how-to guide to photographing birds in your backyard and these tips will help you achieve bird photos that you have always wanted to get, but never knew how.
Setting Up Feeders
The most important consideration in choosing a location for bird feeders is lighting. Most bird photographers choose direct front lighting for shooting their subjects. Birds have lots of color and fine feather detail and direct front lighting shows the beauty of birds in a brilliant manner. The most important thing to remember when considering lighting is to always point your shadow at the bird. This will ensure that your subject is evenly lit with no shadows.
 When hanging feeders for bird photography, avoid placing them too close to your house or too close to the edge of the woods. Both these situations can block light and make it difficult to obtain stunning pictures. The best light for bird photography is early in the morning and late in the afternoon. By placing the feeders in an open area, you will have more opportunity with the best light. Be careful not to place the feeders in an area that doesn’t provide enough cover. I place my feeders about 15-20 feet from the edge of a wooded area. This gives the birds a safe area to travel to and from the feeders and provides a nice background in my images.
Fewer feeders produce more photo opportunities than many  feeders. The idea is to create a food source that lots of birds are using. Choose one small feeder per food source. This in essence will create a waiting line for the feeder and force birds to perch and wait. For suet lovers, set up a separate feeding station. Digging a hole in the ground and “planting” a dead, moss-covered tree works very well for woodpeckers and nuthatches. Position the suet on the backside of the tree so it will not be in sight of the camera. Woodpeckers will often pause before and after feeding on suet, thus offering a few additional photo opportunities before departing.
 feeders. The idea is to create a food source that lots of birds are using. Choose one small feeder per food source. This in essence will create a waiting line for the feeder and force birds to perch and wait. For suet lovers, set up a separate feeding station. Digging a hole in the ground and “planting” a dead, moss-covered tree works very well for woodpeckers and nuthatches. Position the suet on the backside of the tree so it will not be in sight of the camera. Woodpeckers will often pause before and after feeding on suet, thus offering a few additional photo opportunities before departing.
Selecting the Ideal Perch
Perch selection is critical to the natural feel of your photographs. Perches should look natural and not “set-up.” Avoid manmade objects such as processed lumber, metal, or plastic. Instead, walk around your yard and find fallen twigs, small branches, raspberry or rose stalks, or wild plants bearing berries (winterberry holly or bittersweet work well). It’s very important to choose a perch that is natural for the species being photographed. Be very careful when positioning a pruned perch for photography. An obvious snipped or torn branch in a photo is not pleasing to the eye.
Perch selection is critical to the natural feel of your photographs. Perches should look natural and not “set-up.” Avoid manmade objects such as processed lumber, metal, or plastic. Instead, walk around your yard and find fallen twigs, small branches, raspberry or rose stalks, or wild plants bearing berries (winterberry holly or bittersweet work well). It’s very important to choose a perch that is natural for the species being photographed. Be very careful when positioning a pruned perch for photography. An obvious snipped or torn branch in a photo is not pleasing to the eye.
 Think about the species that will be using each perch - you do not want to overpower the bird with a perch. For smaller birds, such as chickadees, goldfinches, and titmice, choose a thin perch, perhaps ¼ to ½ an inch in diameter. For larger birds, such as blue jays and cardinals, a perch of ½ to 1 inch in diameter will look pleasing in a photo.
Carefully position the perches close to the feeders. Remember, the fewer perches you have, the better. You want to ‘force’ the birds to land on a particular perch. Placing a perch one foot under or next to a feeder will provide suitable waiting space or a jumping-off point to the feeder for a hungry bird. It’s also very important to place the perch at the appropriate angle. A good starting point is to mount the perch vertically and then push it directly away from you at a 45-degree angle. This will ensure a profile of the bird. If you want a head-on shot position the perch at a 45-degree angle horizontal to your position.
Before you start snapping photos of birds, it’s important to look at your perch set-up through the viewfinder. What looks good to your eye may not look good through the camera. As you look through the viewfinder, make sure the background is a pleasing color, the perch is at a good angle, and there are no unwanted objects in the frame. Always keep an eye out for new and interesting perches and replace your perches often. If you use the same perch over and over, all your images will look the same.
Desirable Camera Equipment
Most birds that visit feeding stations are quite tame and will tolerate a human very close to their food source. A lens in the 200-300mm range (especially when combined with a digital camera or teleconverters) can produce frame-filling images with these cooperative subjects. Using a tripod will greatly aide in obtaining sharp images. It will also allow you to set the camera to a certain point on a perch so you will be ready when a bird lands. Always remember to pre-focus on the perch to cut down on the time it takes to obtain focus.
Being comfortable is also important. Sitting low in a lawn chair with your camera set up in front of you decreases your profile substantially and will allow you to photograph for extended periods comfortably. Movement is your biggest foe when it comes to birds. If you’re using a short telephoto lens, a bag blind or some camouflage material draped over yourself is also a good idea.
With a little strategy, backyard bird photography can be very rewarding. It is a unique form of wild bird photography and by following the advice above, you can be on your way to producing appealing, natural looking bird images. Do not be afraid to experiment with different perches and set-ups - the more variety you have with food sources and perches, the more species you will be able to photograph. You will be amazed by the interesting songbird images that you can produce in your own backyard!
With a little strategy, backyard bird photography can be very rewarding. It is a unique form of wild bird photography and by following the advice above, you can be on your way to producing appealing, natural looking bird images. Do not be afraid to experiment with different perches and set-ups - the more variety you have with food sources and perches, the more species you will be able to photograph. You will be amazed by the interesting songbird images that you can produce in your own backyard!
Saturday, May 5, 2007
What exactly is metering?
 In the segment on exposure, photo enthusiasts learnt about Canon's built-in multiple metering systems for its EOS AF 35mm SLR cameras and the right way to use them to achieve correct exposures.Metering modes like the multi-segment Evaluative, Partial and Spot, have their own unique way of reading the reflected light off the subject and then calculate the exposure based on the metered light readings.
Most photo enthusiasts will not face any problem understanding what the various metering systems are all about, more so if they are already Canon EOS camera users. But the newcomers, who have just started to learn about photography, may not understand them and know very little about what exactly metering is in photographic term.
Photography is all about using light. You use light to make  photographs via the lighting available. The lighting can be from any sources like natural light, available light, artificial light or from studio strobes and flash guns.You need light to expose the film and to record the image you have visualised. The camera body controls the timing for the light to expose the film via the shutter button which triggers open the shutter curtains. And the camera lens controls both the aperture and the image quality by determining the amount of light required to enter and expose the film through the optical elements that also form and focus the image.
 photographs via the lighting available. The lighting can be from any sources like natural light, available light, artificial light or from studio strobes and flash guns.You need light to expose the film and to record the image you have visualised. The camera body controls the timing for the light to expose the film via the shutter button which triggers open the shutter curtains. And the camera lens controls both the aperture and the image quality by determining the amount of light required to enter and expose the film through the optical elements that also form and focus the image.
But how much light does one need in order to make a photograph? That will be determined by the camera's built-in metering systems or by using a hand-held incident light meter which is used to measure the amount of light that is reflected off or fell on the subject.Metering, then, is about measuring the existing levels of lighting so the right shutter speed or aperture values can be set to obtain the correct exposures - to let in the right amount of light needed to strike the film and form the image.
 A meter reading can be something like this: 1/250 sec. at f/11 or 1/500 sec. at f/8.0. It has to be noted that to get the right meter reading for a given exposure, the camera's built-in metering system have to know what type of film speed is in use.For example, if an ISO 100 film is used, the metering system will calculate the exposure settings based on the current lighting situation to ensure the right amount of light needed to expose the film.
If an ISO 100 film is used to photograph a scene at dusk, the camera's built-in meter will recommend an exposure of 1/60 sec. at f/4.0 in order to get the correct exposure value. If the film used is an ISO 400 film for the same scene, the camera will then recommend the settings to be at 1/60 sec. at f/8.0. This too, will depend on which shooting mode the camera is set.All EOS cameras are designed to base their exposure readings on the shutter speed set by the photographer when used in the Manual Exposure or Shutter-Priority AE modes. If the camera is used in the Aperture-Priority AE mode, the exposure readings will be based on the aperture set by the photographer. The exposure will then be at f/4.0 with a shutter speed of 1/250 sec for the dusk scene when shooting with an ISO 400 film.
Friday, May 4, 2007
How To Photograph Smoke
Here’s a pretty cool abstract photography article on how to go about photographing smoke. I don’t know what I’d ever do with this but you never know, it might come in handy one day. Photocritic.org interviewed Graham Jefferey, of Sensitive Light, and talked to him a little about how to get the smoke just right, lighting techniques for getting that really “cleanly” lit smoke,  digital manipulation and some things that inspire him.
Graham points out that he doesn’t actually take photographs of smoke, he uses the smoke as a tool and his photographs are more about manipulating the tool in such a way he can capture and impressive photo. He uses different lighting techniques to capture those really cool an interesting effects.
If your into photographing absracts then you’ll find this article useful, even if your not playing with smoke. Check it out, it’s worth a look. If you have any thoughts or suggestions let us hear them.
 digital manipulation and some things that inspire him.
Graham points out that he doesn’t actually take photographs of smoke, he uses the smoke as a tool and his photographs are more about manipulating the tool in such a way he can capture and impressive photo. He uses different lighting techniques to capture those really cool an interesting effects.
If your into photographing absracts then you’ll find this article useful, even if your not playing with smoke. Check it out, it’s worth a look. If you have any thoughts or suggestions let us hear them.
Wednesday, May 2, 2007
What is shallow DOF
Shallow depth of field is often used to isolate a subject from its surrounding environment or to make it stand out. Shallow DOF in most cases is a great way to highlight your main subject and get rid of any distractions in the background.
 There are a number of things you might like to try. I’ll start with the easy ones:
 Positioning of Subject
One of the easiest things you can do is position the subject you’re wanting to photograph as far away from any objects behind them as possible. If they are standing right in front of a wall you’ll probably end up with it in focus no matter what else you do - but if they’re standing 100 meters in front of that same wall it’s going to be a lot more blurry. Of course this will only get you so far - you’ll need to do some of what’s coming next as well.
Aperture Priority Mode on your camera
Aperture Priority Mode is a great way to control depth of field as it will ensure your images are well exposed. This mode lets you choose the Aperture (the size of the hole in your lens) and tells the camera to choose all the other settings. This semi-auto mode is a great way to control depth of field as it will ensure your images are well exposed. For shallow depth of field and nice blurry backgrounds choose a large Aperture (the smaller the number the larger the aperture).
 Try taking a few shots at different apertures and see how it affects the background of your shots - this is the best way to learn how to get more creative control in your shots. Zoom LensesI’m not sure what lens most of us use for the portraits. Many zooms will have different maximum apertures at different points along the focal length spectrum. For example if it’s an 18-55mm kit lens it will have a maximum aperture of f3.5 at 18mm and a maximum aperture of f5.6 at 55mm. Many see the bigger aperture at the 18mm end of the range and think that that would be the best focal length for blurry backgrounds.
 The problem with this is that 18mm is a very wide angle and for portraits it can mean you need to get in really close to your subject and it could distort their facial features (not really desirable). Instead I find that shooting at the 55mm end of the lens is best. This means you can stand further back (making your subject more at ease and pushing your background even further away from your camera). You’ll probably still get nice blurry backgrounds if you use the fastest aperture available.
The other good thing about zooms is that they enable you to really fill up your frame with your subject which can give it more prominence and your background less. Get a New LensThis is an ‘easy’ solution in some ways, but hard if you don’t have the budget. Different lenses have different maximum apertures. Those with larger ones are called ‘faster’ and one of the impacts of having a fast lens is that you can make your depth of field smaller (another is that you can shoot in lower light situations without needing the flash).
A good option for Canon DSLRs is the Canon 50mm f/1.8 lens. It’s very fast, it’s a good focal length for portraits and it is one of the most affordable lenses Canon make.Now Guys, please share your shots that you think define the shalow DOF, we will judge them and award the best shot out of all. This is a small weekly competition in other words you may say.
Subscribe to:
Posts (Atom)