Wednesday, May 16, 2007

how to do Postcard Photography

Postcard photography is the pursuit of the perfect scenic picture. Anyone can do it. I manage to make a living from this but it's really just about being in the right place at the right time.

How To Get Clear Pictures

I have been asked many times over the years how I get such deep blue skies and clarity in my pictures.

The answer is simple: I only shoot on exceptionally clear days with great visibility.

For the clearest air, shoot in winter. The views are crisp and sharp and distant mountains are distinct. From February to May, I'm madly visiting all my favorite places, building a year's worth of stock which I'll sell during the rest of the year.

As soon as I arrive at a location, I always check the weather forecast for the next few days. I only shoot in good weather. Many times I have stayed in a hotel room for several days before the weather was right.

I spend part of my time on "bad weather" days looking at postcard racks, skimming picture books, and exploring the area. When the weather breaks, I'm ready to get working.

Amateur vs. Professional

The one big difference I've observed between an amateur photographer and a professional is this: when both stop and look at a beautiful scene, the amateur will take one picture and move on while the pro will take many pictures of the same scene at varying times and exposures before moving on.

Of course, the professional has more time available. But the pro knows he or she must get the perfect exposure because their job is riding on it. It's really simple: if a pro doesn't bring back good, usable photography, they won't be asked to shoot again.

Research is key to getting the best shot. Look for a high viewpoint that combines several landmarks in a tight grouping. Plan on spending ample time at your viewpoint, to get the best exposure, light, and composition.

Images That Sell

I usually shoot every good scene in both horizontal and vertical formats. When I first started out, I shot mostly horizontals, and I lost out on a lot of vertical sales. The initial cost of the extra shot is more than offset by the increased sales.

Calendar company buyers appreciate photographers who have images representing all four seasons. In putting together their calendars each year, they like to deal with as few photographers as possible.

All the stock agencies that I deal with only want digital images submitted. I shoot now with a Nikon D200 camera, and my library of over 200,000 transparencies awaits to be scanned.

Most clients now want to see only digital images. I still sell a lot of film to my clients even though it's been less and less over the past five years. So there is still some film buyers out there and probably will be for the near future. I used to shoot with medium-format as, it turned out, size does matter! I still shoot film with my Nikon F5 and Hasselblad X-Pan.

Equipment

I've been asked many times by beginning pros if it's necessary to buy expensive (i.e. 'fast') lenses. In the case of landscape photography, I don't think so. Most of your pictures will be taken on a tripod, so a fast lens is not needed. Most of my landscapes are taken at F16, F22, or F32. The only exception is aerial photography where one or two fast lenses can come in handy.
One of the most important items in a photographer's equipment is a tripod. The larger and heavier the camera, the more a tripod is needed. To get great depth-of-field, which is important for landscape photography, a tripod is a "must."

As far as filters go, I use only one -- a polarizer. This is really a great filter and, when used properly, increases the color saturation of all the hues in a scene (not just the blue in the sky, as some people think). I have polarizers for all my lenses and take them off only when they aren't needed.

Favorite CitiesSan Diego is my favorite city to photograph. I find the beauty of the landscape to be mind-boggling, offering so many beautiful and varied places to photograph.

My other favorite cities to photograph are San Francisco, Boston, New Orleans, New York, Chicago, Montreal, and Vancouver. Along with San Diego, each of these areas has an ambiance that makes it unique. I have shot these cities over and over again and still look forward to going back and doing it another time.

Sunday, May 13, 2007

How to Make the Best of a Bad Shooting Situation

How to Make the Best of a Bad Shooting Situation

It was a rainy day in Paris. I was in the City of Lights, along with other members of the international photo press, for the debut of Panasonic's latest cameras. I was shooting with the new $349 (estimated street) Lumix DMC-TZ3, which the manufacturer bills as the perfect traveling companion-- pocket-sized but packing 7.2MP, a 10X zoom that starts at a wide 28mm equivalent, image stabilization, and a 3-inch LCD.
But for all that, it couldn't do anything about the rain. Every shot looked dull; even reflections on the wet pavement fell flat. Bad photos of Paris, it is possible? It seemed so.

Then Jerry Grossman of the trade paper, Photo Industry Reporter, held up the LCD of his camera. He'd taken a few images in Sepia mode, and the pictures looked much better than anything shot in color. There was a mass switch to sepia. Granted, not the most sophisticated solution, but it was an idea that helped turn this photo op around.

It's the kind of situation all of us face with our photography -- the weather, the lighting, or the subject may not be cooperating, or you don't have all the time or gear you'd like, but you still have to get good shots. What do you do? Get creative and find workarounds. Here are some solutions for situations that have the makings of photo disasters.

• The Situation:
You're suddenly appointed the party photographer.

The Problem:
All you have is a digital compact, and the tiny flash won't properly light -- let alone flatter -- the guests. Also, capturing tequila-fired red noses isn't going to get you invited next time.

The Solution:
Shut off the flash and switch to black-and-white mode. Yes, the ISO will go through the roof, but in b&w, the digital noise looks like grain. Sort of arty. And chances are, monochrome will be more flattering to all of the revelers.

• The Situation:
A friend asks for a spur-of-the-moment portrait.

The Problem:
Your subject has horribly blotchy skin.

The Solution:
High key. That is, overexpose the shot to drain the detail out of the skin. Digital cameras not only let you use the LCD to see how much overexposure is needed as you bracket (start at a half-stop and work up), but today's sensors also are very good at holding shadow detail while blowing out the highlights in a shot. Which is exactly what you want.

• The Situation:
Aunt Rhodie cooked a delicious roast goose that everyone wants to remember.

The Problem:
The bird doesn't look as good as you hope it will taste.

The Solution:
Shallow depth of field. Go with the widest aperture you can, and focus on that gorgeous sprig of parsley atop the carcass. That's about all that will be sharp. The rest of the image will have that soft, dreamy look so popular in the food magazines from which Aunt Rhodie gets her recipes.

Thursday, May 10, 2007

Backyard Bird Photography

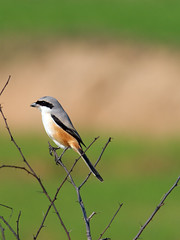
Bird photography is one of the most challenging types of nature photography. Wild birds are often difficult to approach and they never stay in one place for long. Due to the small size and fast-paced behavior of songbirds, large telephoto lenses are often required, and expensive, fast-focusing camera bodies are usually needed. Fortunately, this is not always the case. Your own backyard can serve as a personal studio in which you can be in control of your subjects and obtain beautiful photos. This is one of the very few situations where eye-catching, close-up bird photography is possible without extravagant photo equipment. The following is a how-to guide to photographing birds in your backyard and these tips will help you achieve bird photos that you have always wanted to get, but never knew how.


Setting Up Feeders
The most important consideration in choosing a location for bird feeders is lighting. Most bird photographers choose direct front lighting for shooting their subjects. Birds have lots of color and fine feather detail and direct front lighting shows the beauty of birds in a brilliant manner. The most important thing to remember when considering lighting is to always point your shadow at the bird. This will ensure that your subject is evenly lit with no shadows.


When hanging feeders for bird photography, avoid placing them too close to your house or too close to the edge of the woods. Both these situations can block light and make it difficult to obtain stunning pictures. The best light for bird photography is early in the morning and late in the afternoon. By placing the feeders in an open area, you will have more opportunity with the best light. Be careful not to place the feeders in an area that doesn’t provide enough cover. I place my feeders about 15-20 feet from the edge of a wooded area. This gives the birds a safe area to travel to and from the feeders and provides a nice background in my images.


Fewer feeders produce more photo opportunities than many feeders. The idea is to create a food source that lots of birds are using. Choose one small feeder per food source. This in essence will create a waiting line for the feeder and force birds to perch and wait. For suet lovers, set up a separate feeding station. Digging a hole in the ground and “planting” a dead, moss-covered tree works very well for woodpeckers and nuthatches. Position the suet on the backside of the tree so it will not be in sight of the camera. Woodpeckers will often pause before and after feeding on suet, thus offering a few additional photo opportunities before departing.


Selecting the Ideal Perch
Perch selection is critical to the natural feel of your photographs. Perches should look natural and not “set-up.” Avoid manmade objects such as processed lumber, metal, or plastic. Instead, walk around your yard and find fallen twigs, small branches, raspberry or rose stalks, or wild plants bearing berries (winterberry holly or bittersweet work well). It’s very important to choose a perch that is natural for the species being photographed. Be very careful when positioning a pruned perch for photography. An obvious snipped or torn branch in a photo is not pleasing to the eye.


Think about the species that will be using each perch - you do not want to overpower the bird with a perch. For smaller birds, such as chickadees, goldfinches, and titmice, choose a thin perch, perhaps ¼ to ½ an inch in diameter. For larger birds, such as blue jays and cardinals, a perch of ½ to 1 inch in diameter will look pleasing in a photo.


Carefully position the perches close to the feeders. Remember, the fewer perches you have, the better. You want to ‘force’ the birds to land on a particular perch. Placing a perch one foot under or next to a feeder will provide suitable waiting space or a jumping-off point to the feeder for a hungry bird. It’s also very important to place the perch at the appropriate angle. A good starting point is to mount the perch vertically and then push it directly away from you at a 45-degree angle. This will ensure a profile of the bird. If you want a head-on shot position the perch at a 45-degree angle horizontal to your position.


Before you start snapping photos of birds, it’s important to look at your perch set-up through the viewfinder. What looks good to your eye may not look good through the camera. As you look through the viewfinder, make sure the background is a pleasing color, the perch is at a good angle, and there are no unwanted objects in the frame. Always keep an eye out for new and interesting perches and replace your perches often. If you use the same perch over and over, all your images will look the same.


Desirable Camera Equipment


Most birds that visit feeding stations are quite tame and will tolerate a human very close to their food source. A lens in the 200-300mm range (especially when combined with a digital camera or teleconverters) can produce frame-filling images with these cooperative subjects. Using a tripod will greatly aide in obtaining sharp images. It will also allow you to set the camera to a certain point on a perch so you will be ready when a bird lands. Always remember to pre-focus on the perch to cut down on the time it takes to obtain focus.


Being comfortable is also important. Sitting low in a lawn chair with your camera set up in front of you decreases your profile substantially and will allow you to photograph for extended periods comfortably. Movement is your biggest foe when it comes to birds. If you’re using a short telephoto lens, a bag blind or some camouflage material draped over yourself is also a good idea.
With a little strategy, backyard bird photography can be very rewarding. It is a unique form of wild bird photography and by following the advice above, you can be on your way to producing appealing, natural looking bird images. Do not be afraid to experiment with different perches and set-ups - the more variety you have with food sources and perches, the more species you will be able to photograph. You will be amazed by the interesting songbird images that you can produce in your own backyard!

Saturday, May 5, 2007

What exactly is metering?

In the segment on exposure, photo enthusiasts learnt about Canon's built-in multiple metering systems for its EOS AF 35mm SLR cameras and the right way to use them to achieve correct exposures.Metering modes like the multi-segment Evaluative, Partial and Spot, have their own unique way of reading the reflected light off the subject and then calculate the exposure based on the metered light readings.

Most photo enthusiasts will not face any problem understanding what the various metering systems are all about, more so if they are already Canon EOS camera users. But the newcomers, who have just started to learn about photography, may not understand them and know very little about what exactly metering is in photographic term.

Photography is all about using light. You use light to make photographs via the lighting available. The lighting can be from any sources like natural light, available light, artificial light or from studio strobes and flash guns.You need light to expose the film and to record the image you have visualised. The camera body controls the timing for the light to expose the film via the shutter button which triggers open the shutter curtains. And the camera lens controls both the aperture and the image quality by determining the amount of light required to enter and expose the film through the optical elements that also form and focus the image.

But how much light does one need in order to make a photograph? That will be determined by the camera's built-in metering systems or by using a hand-held incident light meter which is used to measure the amount of light that is reflected off or fell on the subject.Metering, then, is about measuring the existing levels of lighting so the right shutter speed or aperture values can be set to obtain the correct exposures - to let in the right amount of light needed to strike the film and form the image.


A meter reading can be something like this: 1/250 sec. at f/11 or 1/500 sec. at f/8.0. It has to be noted that to get the right meter reading for a given exposure, the camera's built-in metering system have to know what type of film speed is in use.For example, if an ISO 100 film is used, the metering system will calculate the exposure settings based on the current lighting situation to ensure the right amount of light needed to expose the film.


If an ISO 100 film is used to photograph a scene at dusk, the camera's built-in meter will recommend an exposure of 1/60 sec. at f/4.0 in order to get the correct exposure value. If the film used is an ISO 400 film for the same scene, the camera will then recommend the settings to be at 1/60 sec. at f/8.0. This too, will depend on which shooting mode the camera is set.All EOS cameras are designed to base their exposure readings on the shutter speed set by the photographer when used in the Manual Exposure or Shutter-Priority AE modes. If the camera is used in the Aperture-Priority AE mode, the exposure readings will be based on the aperture set by the photographer. The exposure will then be at f/4.0 with a shutter speed of 1/250 sec for the dusk scene when shooting with an ISO 400 film.

Friday, May 4, 2007

How To Photograph Smoke

Here’s a pretty cool abstract photography article on how to go about photographing smoke. I don’t know what I’d ever do with this but you never know, it might come in handy one day. Photocritic.org interviewed Graham Jefferey, of Sensitive Light, and talked to him a little about how to get the smoke just right, lighting techniques for getting that really “cleanly” lit smoke, digital manipulation and some things that inspire him.
Graham points out that he doesn’t actually take photographs of smoke, he uses the smoke as a tool and his photographs are more about manipulating the tool in such a way he can capture and impressive photo. He uses different lighting techniques to capture those really cool an interesting effects.
If your into photographing absracts then you’ll find this article useful, even if your not playing with smoke. Check it out, it’s worth a look. If you have any thoughts or suggestions let us hear them.

Thursday, May 3, 2007

Framing Your Photos

A good argument could be made that one of the most frequently used if not popular digital imaging software tools is the crop tool. Not necessarily because people really want to use it, but because they have forgotten to frame their shots properly before snapping away. Granted, it is easy enough to crop away unwanted areas after the fact and thereby make them look like they were well composed in the first place, but unless you have a high-megapixel camera and have remembered to shoot at high resolution, cropping can put severe limitations on the size at which your photos can be presented onscreen or in print without looking jaggy.
Here are some well-framed photos.

If you don't intend to run full-screen slide shows for friends and family or print out any enlargements, then the limitations of cropping won't worry you. But if you'd like to retain as much flexibility in your images as possible and avoid having to bother with cropping, then here are a few easy-to-remember things to think about.


First, if your photo is going to include people, take a moment to reflect on what you'd like to have in the photo before you request that your subjects hold still. Once they are standing still and holding a smile you'll be under pressure to get on with it and will likely spend less time thinking about image composition.


Second, look for both natural peripheral (side) borders that might frame your shot nicely and for objects near the sides of your shot that might be distracting. Think of it like this: While fitting the full trunk of a tree into your border might look great, including the public trash can in your shot of a cathedral probably won't.


Finally, with the above in mind, try to ensure that you are getting just the right amount of foreground and background.


There is no hard and fast rule for specific amounts as they will change according to what kind of photo you are taking. But here are some general guidelines:


  • The horizon should usually be above the middle of the photo.

  • In people shots, foreground should be minimized, while in landscape shots more foreground can lend better perspective.

  • Likewise, don't allow too much additional space on either side of your subjects in people shots.


These tips should help keep you from having to use your crop tool too often. Happy snapping!

IMPROVING YOUR PHOTOGRAPHY

Composition


In a recent "Photography Talk" column, I discussed developing an awareness of light and its relationship to the subjects in your photographs. Light and shadow become integral parts of composition when skillfully incorporated, and should be your first consideration before setting up to make a photograph. When lighting conditions have been evaluated and the camera position chosen to take best advantage of the light/subject relationship, the next step is composing the photograph.


Composing a photograph is essentially an editing process — deciding what to leave in and what to leave out. There are basic accepted criteria for good composition that, when applied, will help you achieve visual harmony or dynamic tension. Faithfully following all the "rules" of composition will not necessarily culminate in a good photograph. The rules are intended more as guidelines than strict dogma, but they will help you design well-balanced images that are pleasing to the eye. While it may be the subject that initially attracts viewers to stop and look at an image, it is the artistry of composition that holds them there.


Here are some of the basic elements of effective composition:
STRONG FOCAL POINT
It is usually best to have one main subject as the focal point because a photograph can successfully tell only one story. The main subject can be one object or several, and you may decide to include a secondary subject. But make sure nothing detracts from the focal point. Lacking a strong center of interest forces the viewer to search for something to observe, eyes seeking a resting place. Always give the focal point sufficient prominence in the composition so that all other elements are subordinate. Even if the focal point is small, it can be given prominence by composing empty space around it.

RULE OF THIRDS
The exact center of any composition is not a satisfying place for the viewer's eye to come to rest. With the main subject placed in the center, the viewer is less likely to explore the rest of the photograph. In fact, it is preferable to keep the viewer's eye moving. To create movement in your photographs and to avoid the static bull's-eye composition, use the rule-of-thirds guidelines for off-center placement of the main subject. It is the traditional way to create a well-balanced composition and has been used by artists for centuries. To apply the rule of thirds, imagine the scene in your viewfinder divided into thirds both horizontally and vertically, similar to a tic-tac-toe grid laid over the scene. Place the main subject and other important elements of your composition along the grid lines or at the points where the grid lines intersect. Employing the rule of thirds not only helps avoid symmetrical composition but also provides a pleasing proportion of space around the main subject to prevent distracting tension between the focal point and the edge of the frame.

A common compositional faux pas occurs when the horizon is positioned directly through the middle of the frame, bisecting the scene. Utilizing the rule of thirds, the horizon is placed near one of the grid lines. This will lower or raise the horizon in the frame and give emphasis either to a dramatic sky or an interesting foreground.


SIMPLICITY
The best way to present a clear message in a photograph is to keep the composition simple. The fewer elements you have to work with, the easier it is to design a pleasing image and control the viewer's eye movement. There are several ways to simplify a composition, but the primary method is to move in closer to the main subject. Photojournalist Robert Capa said it best: "If your pictures aren't good enough, you're not close enough." Whether you physically move the camera position closer or zoom in optically, getting closer allows you to fill the frame with the subject, paring the composition down to its essential components. It removes visual distractions from the edges of the frame, eliminates superfluous elements and defocuses the background. Shallow depth of field helps to isolate the subject from a busy background by blurring objectionable clutter, and may even create soft pools of complementary color behind the subject.
LEADING LINESAnother compositional technique to create energy and movement in a photograph is the use of leading lines. Whether they are graceful curves or dynamic diagonals, all lines should lead the viewer's eye to the focal point. But be careful with the use of leading lines. They can also work against you by directing the eye away from the subject or, if the line divides the photograph in two, leading it right out of the image.
A few other factors to consider when refining your compositions:
• Let the lines in your composition decide if the scene should be shot horizontally or vertically. If the scene presents long vertical lines, compose vertically to take full advantage of them. When presented with strong horizontal lines, use a horizontal camera orientation. This plays to the strengths of the composition and also will help to avoid wasted space at the edges of the frame.
• Be aware of white or light areas in your compositions. The viewer's eye will always go to the brightest part of a scene, so eliminate any bright spots that will pull attention away from the main subject.
• Look for repetition of shapes and textures. Patterns create rhythm and motion in a composition.
• Compose boldly using sweeping diagonal lines. Long horizontal lines can be static and visually boring. Conversely, diagonal lines add visual energy. Change camera angle to pivot prevailing lines so they don't run parallel to the top and bottom edges of the frame.
• Try using a wide-angle lens. Compose for a foreground, middle ground and background with overlapping compositional elements to create a three-dimensional effect in a two-dimensional photograph.


Obviously, I am only able to scratch the surface of composition basics in this space. There are many other techniques that can lead you to visual harmony. And then there's the other side of the coin — how to successfully break the rules of composition to create dynamic tension. But it is important to know and practice the basics before deviating from them. After they have become second nature to you, begin to experiment. It's okay to break the rules, but do so knowingly and intentionally. When you know and understand the basics of good composition, you will be free to roam the spatial relationships within your viewfinder.

Wednesday, May 2, 2007

What is shallow DOF

Shallow depth of field is often used to isolate a subject from its surrounding environment or to make it stand out. Shallow DOF in most cases is a great way to highlight your main subject and get rid of any distractions in the background.


There are a number of things you might like to try. I’ll start with the easy ones:

Positioning of Subject

One of the easiest things you can do is position the subject you’re wanting to photograph as far away from any objects behind them as possible. If they are standing right in front of a wall you’ll probably end up with it in focus no matter what else you do - but if they’re standing 100 meters in front of that same wall it’s going to be a lot more blurry. Of course this will only get you so far - you’ll need to do some of what’s coming next as well.


Aperture Priority Mode on your camera


Aperture Priority Mode is a great way to control depth of field as it will ensure your images are well exposed. This mode lets you choose the Aperture (the size of the hole in your lens) and tells the camera to choose all the other settings. This semi-auto mode is a great way to control depth of field as it will ensure your images are well exposed. For shallow depth of field and nice blurry backgrounds choose a large Aperture (the smaller the number the larger the aperture).

Try taking a few shots at different apertures and see how it affects the background of your shots - this is the best way to learn how to get more creative control in your shots. Zoom LensesI’m not sure what lens most of us use for the portraits. Many zooms will have different maximum apertures at different points along the focal length spectrum. For example if it’s an 18-55mm kit lens it will have a maximum aperture of f3.5 at 18mm and a maximum aperture of f5.6 at 55mm. Many see the bigger aperture at the 18mm end of the range and think that that would be the best focal length for blurry backgrounds.


The problem with this is that 18mm is a very wide angle and for portraits it can mean you need to get in really close to your subject and it could distort their facial features (not really desirable). Instead I find that shooting at the 55mm end of the lens is best. This means you can stand further back (making your subject more at ease and pushing your background even further away from your camera). You’ll probably still get nice blurry backgrounds if you use the fastest aperture available.


The other good thing about zooms is that they enable you to really fill up your frame with your subject which can give it more prominence and your background less. Get a New LensThis is an ‘easy’ solution in some ways, but hard if you don’t have the budget. Different lenses have different maximum apertures. Those with larger ones are called ‘faster’ and one of the impacts of having a fast lens is that you can make your depth of field smaller (another is that you can shoot in lower light situations without needing the flash).


A good option for Canon DSLRs is the Canon 50mm f/1.8 lens. It’s very fast, it’s a good focal length for portraits and it is one of the most affordable lenses Canon make.Now Guys, please share your shots that you think define the shalow DOF, we will judge them and award the best shot out of all. This is a small weekly competition in other words you may say.

Through The Lens


In less than a decade, the advances of imaging technology have nearly outstripped our ability to define them, let alone in understanding how they are redefining photography. For most photographers, the vicarious realm of film has always been less a representation of life than it is an affirmation of it. We trade our days to exist in a state of moments, venturing through the lens in an effort to define them. Like others who live by the lens, the relevance of film in my life was not unlike my home - safe and uncontested. I grew up with it. It nurtured me. The camera gave me a direction in life. But the feelings I had experianced over the invasiveness of digital technology with respect to the film medium was akin to watching the house burn down - I seemed able only to stand by and regard it all with a sort of induced chagrin.


So for myself, the only questions that remained were, what next? How could I justify acknowledging something that would make me feel as though I'd sold out? Was I so utterly entrenched with the uneasiness that comes from change that in being contrary I felt above it all?The answer, I found, was to reckon with it and to relearn my craft by embracing the additional perspectives that this astonishing technology afforded me. And while it may be argued that digital has already usurped films dominance, the moments we define will still be done - as always - through the lens...This group is about the art of the shooter and the subjects that matter most to them. Opinions are encouraged, debate is invited, but flaming is forbidden. Tech help is important, but the study of technique is more interesting. Conversations and messages regarding a photographer's passion for the art, real and surreal are most welcome. Stories about and for the quest of the perfect shot would be fine. Words in praise of a mentor would be better still. Whatever level of interest, passion or convention, regard this group as a haven for your art.